|
サイズ: 2373
コメント:
|
サイズ: 2390
コメント:
|
| 削除された箇所はこのように表示されます。 | 追加された箇所はこのように表示されます。 |
| 行 1: | 行 1: |
| ClusterSystemAnsysUsageについて、ここに記述してください。 | Describe how to use the Cluster System ANSYS function here. |
| 行 3: | 行 3: |
| 1. ~/.bashrc に以下の記述を追加して,ログインノード(wdev.edu.tut.ac.jp または cdev.edu.tut.ac.jp)にログインした時に,特別な設定なしに ANSYS が利用できる状態にしておく. | 1. Save the following string in ~/.bashrc so that ANSYS can be used without any extra specifications when logging into the target node (wdev.edu.tut.ac.jp or cdev.edu.tut.ac.jp). |
| 行 8: | 行 8: |
| 2. ログインノード(wdev.edu.tut.ac.jp または cdev.edu.tut.ac.jp)にログイン.module list コマンドを実行して,ANSYS の設定が行われていることを確認. | 2. Log into the target node (wdev.edu.tut.ac.jp or cdev.edu.tut.ac.jp). Execute the '''module list''' command to confirm that the ANSYS specification has been set. |
| 行 15: | 行 15: |
| 3. ansyswb145 コマンドを実行して,ANSYS Workbench を起動する. | 3. Execute '''ansyswb145''' command to start ANSYS Workbench. |
| 行 20: | 行 20: |
| 4. ANSYS Workbench のメニューで,Tools -> Launch Remote Solve Manager と起動. | 4. In the ANSYS Workbench menu, click '''Tools''' -> '''Launch Remote Solve Manager'''. |
| 行 22: | 行 22: |
| * 疑問: 既に起動済みの場合,「Remote Solve Manager is already running, and can be accessed via the RSM tray icon from the Notification Area or System Tray on the Taskbar.」というエラーが出るのだが,RSM のアイコンが見つからない.どこにある? | * Question: When the Remote Solve Manager is already up and running, the following error message is displayed: “Remote Solve Manager is already running, and can be accessed via the RSM tray icon from the Notification Area or System Tray on the Taskbar.” However, I cannot find the RSM icon. Where is it? |
| 行 24: | 行 26: |
| 5. Compute Servers を右クリック,Add を選択. {{attachment:ansys-rsm-add-compute-server-context-menu.png}} | 5. Right-click '''Compute Servers''' and choose '''Add'''. {{attachment:ansys-rsm-add-compute-server-context-menu.png}} |
| 行 26: | 行 28: |
| 6. Compute Server Properties の General タブで,以下のように入力する. | 6. In the '''Compute Server Properties''' dialog, click the '''General''' tab and type data as follows. |
| 行 33: | 行 35: |
| 7. Compute Server Properties の Cluster タブで,以下のように入力する. | 7. In the '''Compute Server Properties''' dialog, click the '''Cluster''' tab and type data as follows. |
| 行 36: | 行 38: |
| * Shared Cluster Directory => /work/ユーザ名/ansys | * '''Shared Cluster Directory''': /work/user_name/ansys |
| 行 41: | 行 43: |
| 8. 作成した演算サーバを右クリックして,Test Server を選択. | 8. Right-click the created computer server and choose '''Test Server'''. |
| 行 45: | 行 47: |
| 9. しばらく待って,以下のようにジョブの状態が「Finished」になれば正常に設定完了.「Failed」と表示された場合は,どこかに間違いがある. | 9. When the '''Status''' for the job is changed to “Finished,” the setup has been completed successfully (this may take some time). If the '''Status''' shows “Failed,” check all the provided data items are correct. |
| 行 49: | 行 51: |
| 10. Queues を右クリック,Add を選択. | 10. Right-click '''Queues''' and choose '''Add'''. |
| 行 53: | 行 55: |
| 11. Queue の名前,どの計算サーバを使うか設定する. | 11. In the '''Queue Properties''' dialog, specify '''Name''' of the queue and '''Assigned Server'''. |
Describe how to use the Cluster System ANSYS function here.
1. Save the following string in ~/.bashrc so that ANSYS can be used without any extra specifications when logging into the target node (wdev.edu.tut.ac.jp or cdev.edu.tut.ac.jp).
eval `/usr/bin/modulecmd bash load ansys14.5`
2. Log into the target node (wdev.edu.tut.ac.jp or cdev.edu.tut.ac.jp). Execute the module list command to confirm that the ANSYS specification has been set.
$ module list
Currently Loaded Modulefiles:
  1) intelmpi.intel   2) ansys14.5
3. Execute ansyswb145 command to start ANSYS Workbench.
$ ansyswb145
4. In the ANSYS Workbench menu, click Tools -> Launch Remote Solve Manager.
- Question: When the Remote Solve Manager is already up and running, the following error message is displayed:
“Remote Solve Manager is already running, and can be accessed via the RSM tray icon from the Notification Area or System Tray on the Taskbar.” However, I cannot find the RSM icon. Where is it?
5. Right-click Compute Servers and choose Add. 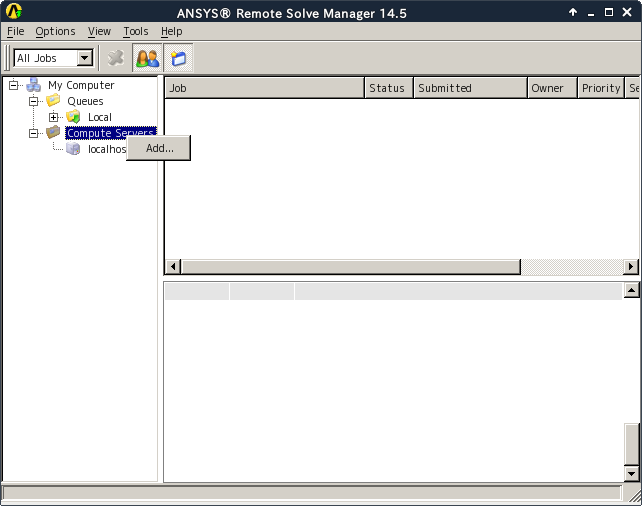
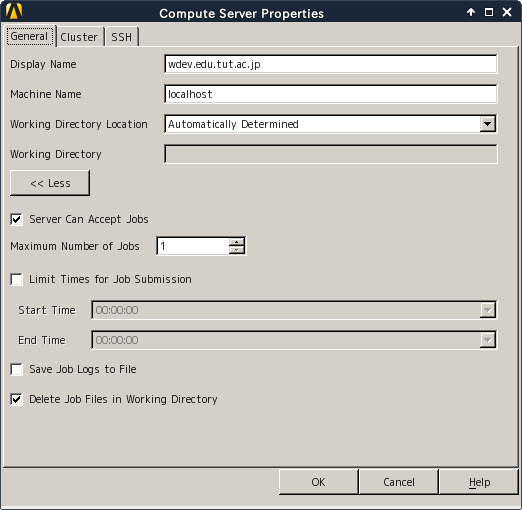
6. In the Compute Server Properties dialog, click the General tab and type data as follows.
Display Name => wdev.edu.tut.ac.jp
Machine Name => localhost
7. In the Compute Server Properties dialog, click the Cluster tab and type data as follows.
Cluster Type => PBS
Shared Cluster Directory: /work/user_name/ansys
PBS Job Submission Arguments => -q wSrchq

8. Right-click the created computer server and choose Test Server.

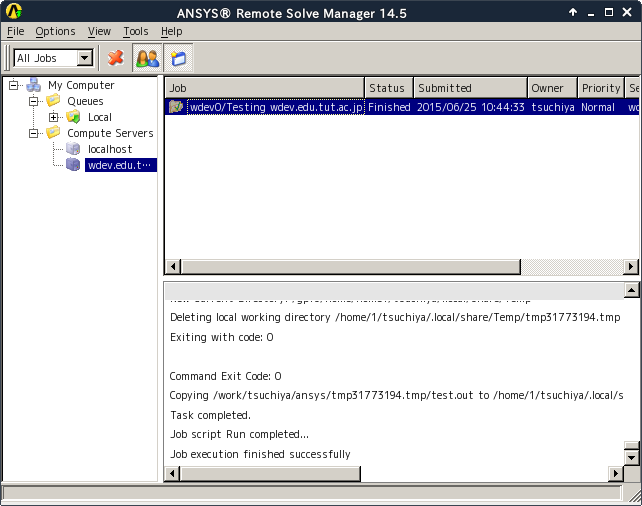
9. When the Status for the job is changed to “Finished,” the setup has been completed successfully (this may take some time). If the Status shows “Failed,” check all the provided data items are correct.
10. Right-click Queues and choose Add.
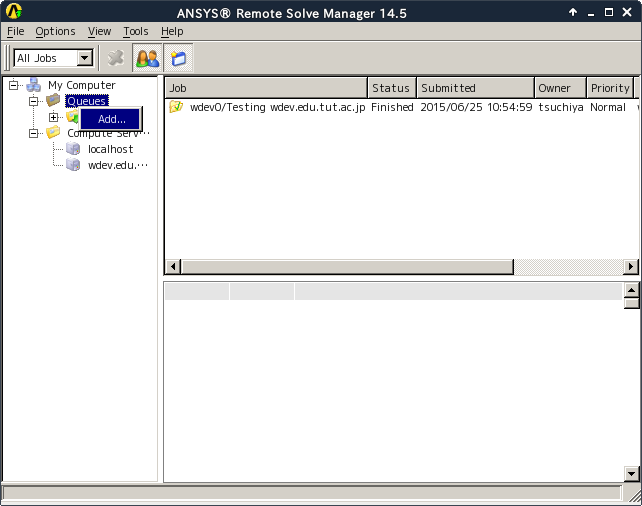
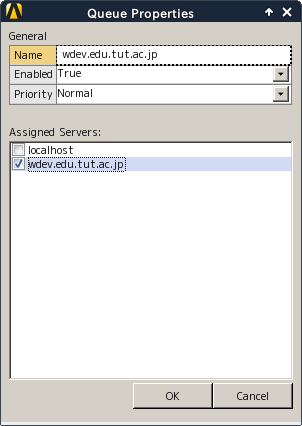
11. In the Queue Properties dialog, specify Name of the queue and Assigned Server.
